


Mastering the FFXIV Worqor Lar Dor Extreme Challenge: A Comprehensive Walkthrough

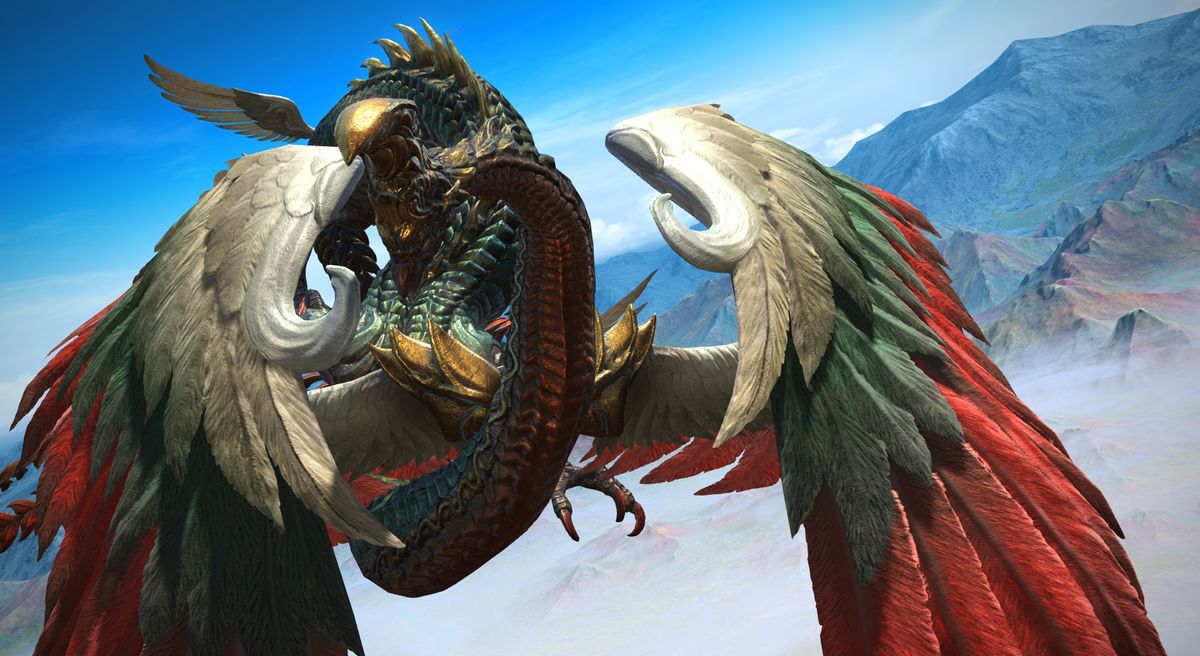
Ready to embark on an epic battle against the formidable Valigarmanda in Final Fantasy XIV’s Worqor Lar Dor (Extreme) trial? Brace yourself for a thrilling encounter that will push your skills to the limit. In this meticulously crafted guide, we’ll equip you with invaluable insights and proven strategies to conquer this daunting foe, ensuring a seamless and rewarding experience.
Table of Contents
- 1 Unlocking the Worqor Lar Dor (Extreme) Trial
- 2 Preparing for the Encounter
- 3 Valigarmanda’s Formidable Arsenal
- 4 Phase One: Skyruin of Flame
- 5 Phase Two: Beacon Adds
- 6 Phase Three: Skyruin of Ice
- 7 Phase Four: Skyruin of Lightning
- 8 Rewards and Loot
- 9 Boosting Your FFXIV Experience with GladiatorBoost
- 10 Conclusion
Unlocking the Worqor Lar Dor (Extreme) Trial
To gain access to this challenging trial, you must first complete the main scenario quest “Dawntrail” and engage with the Wandering Minstrel in Tuliyollal. This encounter is available for level 100 players, but requires a minimum item level of 690 to queue solo. If you’re part of a premade party, this requirement can be bypassed.
Preparing for the Encounter
Before diving headfirst into battle, it’s crucial to properly prepare your party. Divide your raid into two light parties, each consisting of one tank, one healer, and two damage dealers (DPS). Assign support partners, pairing tanks with melee DPS and healers with ranged or caster DPS. Utilize numbered waymarks to designate each partner stack’s position.
Valigarmanda’s Formidable Arsenal
At the heart of this encounter lies the fearsome “Skyruin” mechanic. Valigarmanda will cast this devastating ability three times, each time ushering in a different elemental phase: flame, lightning, and ice. Each cast inflicts massive raid-wide magical damage, a potent damage-over-time effect, and transforms the arena into the corresponding elemental realm.
Accompanying each “Skyruin” cast is the dreaded “Triscourge,” which afflicts players with elemental debuffs based on their roles. Mastering the strategies to mitigate these debuffs will be the key to your triumph.
Valigarmanda’s arsenal also includes a series of unforgiving attacks without cast bars, triggered by specific animations. These attacks, such as “Strangling Coil,” “Susurrant Breath,” and “Slithering Strike,” can inflict potent damage-over-time effects and the “Trauma” debuff, which stuns players if they accumulate too many hits.
Phase One: Skyruin of Flame
The battle commences on a raised platform, where players must be cautious not to fall off the arena. Valigarmanda’s positioning is always at the front, eliminating the need for positional considerations.
During this phase, Valigarmanda unleashes a barrage of abilities, including “Spikesicle,” which shoots icicles in curved line AoEs, leaving explosive ice blocks in their wake. “Volcanic Drop” signals an imminent eruption, triggering a large AoE on either the east or west side of the arena, accompanied by ground AoEs on random players.
The “Triscourge” mechanic introduces a series of debuffs, including “Calamity’s Bolt” (unmarked AoE), “Calamity’s Chill” (requiring movement to avoid freezing), and “Calamity’s Inferno” (unmarked stack for healers). Additionally, players must navigate the “Charring Cataclysm” (two-player stack), “Mountain Fire” (towers that must be soaked by tanks), and “Disaster Zone” (heavy raid-wide damage).
Phase Two: Beacon Adds
In this phase, Valigarmanda becomes invulnerable and summons three Beacon adds. These adds must be eliminated before Valigarmanda’s “Ruinous Power” bar reaches 100%.
Valigarmanda employs “Calamitous Cry,” a series of line AoE stack markers alternating between tanks and healers, accompanied by conal AoEs. As the fight progresses, Valigarmanda gains a damage-up buff with each cast.
Ultimately, Valigarmanda unleashes “Tulidisaster,” a devastating ultimate attack that deals three instances of heavy raid-wide magical damage, each stronger than the previous one, and inflicts “Perpetual Conflagration,” a persistent damage-over-time effect.
Phase Three: Skyruin of Ice
In this phase, players face the possibility of being frozen and spawning ice block adds that must be eliminated to free them. Valigarmanda’s abilities include “Northern Cross” (a large line AoE), “Chilling Cataclysm” (Arcane Spheres that create line AoEs), “Freezing Dust” (requiring constant movement), and “Ice Talon” (an AoE magical tank buster).
Strategically navigating through this phase involves dodging “Northern Cross” while simultaneously handling Valigarmanda’s Cataclysm combinations and “Spikesicle.” Players must also contend with “Freezing Dust” and manage the expiration of “Calamity’s Bolt” debuffs.
Phase Four: Skyruin of Lightning
The final phase takes place on an arena with six panels that cause players to levitate, a mechanic essential for dodging certain attacks. However, being levitated during direct damage attacks can prove lethal.
Valigarmanda’s abilities in this phase include “Calamity’s Fulgur” (unmarked AoE), “Calamity’s Frost” (ice boulders that require levitation), “Calamity’s Embers” (unmarked stack for healers), “Hail of Feathers” (proximity AoEs that must be destroyed), “Blighted Bolt” (destroys all feathers), “Crackling Cataclysm” (AoE under all players), “Thunderous Breath” (map-wide conal AoE requiring levitation), and “Ruinfall” (a tower that must be soaked by tanks).
Players must carefully navigate the expiration of debuffs, dodge Cataclysm combinations, and manage levitation mechanics while mitigating damage from Valigarmanda’s onslaught.
Rewards and Loot
Upon vanquishing Valigarmanda, players can claim their hard-earned rewards from the treasure coffer, including the Skyruin Weapon Coffer (Item Level 710), a random item level 710 Skyruin weapon, the Ruinous Plume, and the Faded Copy of The Skyruin. Additionally, there’s a rare chance to obtain the coveted Wings of Ruin mount.
Furthermore, all party members will receive one Skyruin Totem, with ten of these totems exchangeable for any Skyruin weapon of their choice.
Boosting Your FFXIV Experience with GladiatorBoost
For those seeking a seamless and hassle-free journey through the Worqor Lar Dor (Extreme) trial, GladiatorBoost offers top-notch FFXIV boosting services. Our team of skilled professionals is dedicated to providing prompt, transparent, and affordable assistance, ensuring you can conquer this challenging encounter with ease. GladiatorBoost is your go-to destination for leveling up your gaming experience, fostering a sense of reliability and customer satisfaction.
Conclusion
Mastering the FFXIV Worqor Lar Dor Extreme trial is a true test of skill, strategy, and perseverance. By meticulously studying this comprehensive guide and implementing the proven tactics outlined within, you’ll be well-equipped to face Valigarmanda’s wrath and emerge victorious. Remember, practice makes perfect, and with determination, you can conquer even the most formidable foes in the realm of Final Fantasy XIV.
Related Guides

Unlock Every Free Weapon & Runner Shell Skin in Marathon (Complete Guide)
Where to Find the Singularity Renown Quartermaster in WoW Midnight

ARC Raiders Dam Controlled Access Zone Key: Where to Find & Use It

Marathon Equitable Distribution Contract Guide: All Steps Explained